


Canva, Graphic Design Tips, Printing Tips
How To Print From Canva: Step-by-Step Guide to Clear, Sharp, Professional Prints

Last Updated: March 20, 2026
How to Properly Prepare Canva Artwork for Professional Printing
Designing in Canva is easy. That is exactly why so many people use it for everything from business cards and flyers to brochures, postcards, and vinyl banners.
That convenience is Canva’s strength.
It is also where a lot of printing problems begin.
What looks clean, sharp, and perfectly balanced on a screen does not always survive contact with real production. A file that feels “done” inside Canva may still be completely unfit for a commercial press, a digital production device, or a large-format printer. That disconnect is the source of a huge percentage of the failed files print shops receive every day.
Here is the part many people never get told:
Canva is a design platform. It is not a print production platform.
Those are not the same thing.
At a commercial print facility, files do not simply get dropped into a printer and come out finished. They move through a technical workflow that may include preflight review, color conversion, RIP processing, imposition, press output, trimming, folding, laminating, mounting, scoring, or finishing. Every stage introduces physical limitations and tolerances. Canva does not automatically protect you from those limitations.
This is why we see it constantly.
A customer sends over artwork that looks polished on screen. Nice fonts. Nice layout. Decent photos. Everything appears centered and balanced.
Then it goes into production.
Suddenly the background does not bleed. A dark edge reveals a thin white sliver after trimming. A phone number sits too close to the edge and looks awkwardly off-center. A logo that looked fine on screen prints soft and jagged. A neon blue shifts duller than expected. A thin border around a postcard comes out uneven. A tri-fold brochure panel does not fold correctly because all three panels were designed as equal widths.
Those are not random shop problems.
Those are file setup problems.
This guide is designed to prevent those problems before they cost you time, money, reprints, frustration, or embarrassment. It is not a beginner checklist. It is a deeper look at what actually happens to Canva artwork inside real production environments, why common Canva mistakes show up so clearly in print, and how to prepare Canva files for printing in a way that gives you a much better outcome.
If you understand what printers actually need and why they need it, you will make better design decisions from the start. And that is what separates “it looked good on my screen” from a file that is truly press-ready.
Why Print Preparation Matters and Why So Many Canva Files Fail
The biggest misunderstanding in print is assuming that a design is ready because it looks good visually.
Printing is not visual first. It is mechanical first.
That distinction matters more than most Canva users realize.
When you design on screen, you are looking at a controlled digital preview. Elements snap into place. Colors glow because the screen is made of light. Nothing moves. Nothing is cut. Nothing absorbs ink. Nothing shifts in a stack. Nothing curls because of heat. Nothing stretches because of humidity.
Production is completely different.
Once your file enters a commercial workflow, it becomes part of a physical process. On many jobs, your artwork is not printed one piece at a time at final size and hand-trimmed by a robot with infinite precision. It is often imposed onto larger sheets with multiple copies, crop marks, gripper margins, and layout positioning designed for press efficiency. Those sheets are printed, stacked, moved, cut, and sometimes folded or laminated.
That means real-world variables enter the equation.
A cutter blade has tolerance. A stack of paper can shift slightly. Sheets can expand or contract. Front-to-back registration can drift a little. A fold can land slightly off. Laminated pieces can make small trim inconsistencies more visible because the edge becomes crisper and more reflective. Toner-based digital devices and inkjet large-format printers do not lay down color the same way, and coated versus uncoated stocks do not respond the same way to the same file.
This is why printers ask for bleed, safe zones, high-resolution images, correct sizing, and proper export settings. They are not being picky. They are accounting for the realities of production.
Here is what happens when those realities are ignored.
A background ends exactly at the trim edge instead of extending past it. The sheet trims a hair differently than expected. Now there is a visible white sliver on one side.
A border is placed close to the edge of a postcard. The trim shifts slightly. Now the border is thicker on the left and thinner on the right, making the entire card look crooked.
A phone number is placed too close to the edge of a flyer. Even if it does not get cut, the final piece feels visually off and unprofessional because the spacing is inconsistent.
A logo pulled from Facebook is enlarged inside Canva. It looks decent on screen. In print, it breaks apart because it never had enough pixel data to begin with.
A vivid RGB blue looks electric on the monitor and flat in print because the original color lived outside what CMYK ink could reproduce.
These failures happen every day. We see them constantly. And most of them were preventable before the job ever reached the pressroom.
That is why proper Canva print setup matters. Not because printers enjoy technical rules, but because files move through equipment, and equipment does not care what looked good on screen. It only reproduces what is actually in the file.
Setting Up Your Canva Document Correctly From the Start
One of the easiest ways to ruin a print job is to begin with the wrong document size and try to fix it later.
That sounds simple, but it causes more downstream trouble than most people realize.
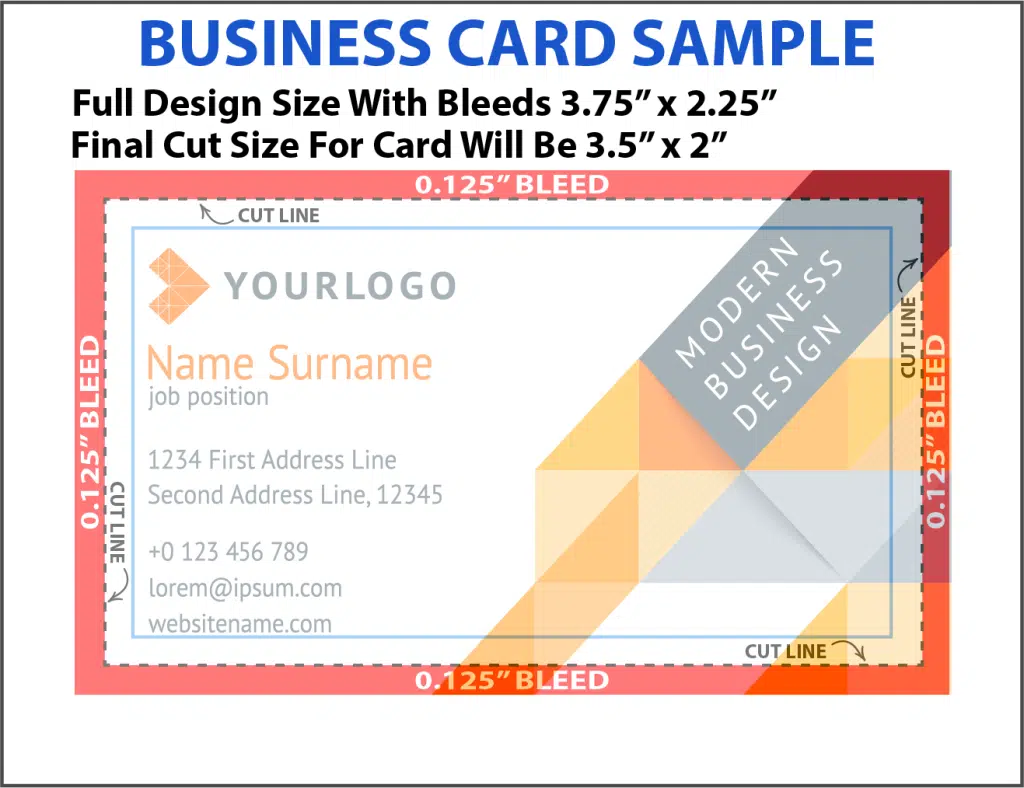
Every printed piece has a final finished size, called the trim size. A standard business card is 3.5″ x 2″. A common flyer is 8.5″ x 11″. A postcard may be 4″ x 6″. A brochure might start as 8.5″ x 11″ and fold down into panels. That finished size is not a suggestion. It is the basis for the entire file.
Your Canva document should match that intended format from the beginning.
When it does not, the problems multiply.
We see files designed at sizes that are “close enough” and later stretched to match the actual product. An 8″ x 10″ file gets enlarged to fit an 8.5″ x 11″ flyer. A square social graphic gets repurposed into a vertical handout. A small design is scaled up for a larger printed piece because someone assumes Canva will just make it work.
Here is what happens when that shortcut is taken.
Spacing changes. Margins feel wrong. Text that once looked balanced now sits uncomfortably near an edge. Photos lose quality when enlarged. Logos soften. The overall design starts to feel slightly off even if you cannot immediately explain why.
That is because resizing a layout after the fact does not just change dimensions. It changes proportion, effective image resolution, visual tension, and layout relationships.
This is even more important on folded pieces.
A lot of people assume a tri-fold brochure means three identical panels. In real production, that is often not the case. One inside panel may need to be slightly narrower so the brochure folds cleanly without buckling. If all three panels are designed at equal widths, the fold may feel cramped, content may sit too close to a crease, or panel edges may not align properly after finishing.
We have seen this many times on tri-fold brochures and booklets. A design looks perfectly symmetrical in Canva, but once it is physically folded, the mechanics expose the flaw.
There is also the issue of orientation and intended output.
A Canva design made for digital viewing may not translate well to press production if it was built without considering trim, bleed, or actual physical dimensions. A layout that feels roomy on screen might be cramped once it exists as a handheld piece. Thin text may be readable on a monitor but less legible when printed on uncoated stock. A tiny logo may feel fine in the layout but lose authority once printed.
The correct approach is not complicated, but it requires discipline:
Start with the exact final print size. Confirm the product specs before you design. If the piece folds, make sure you understand the panel structure. If it is a banner, determine whether you are designing full size or at scale. If the job will be double-sided, think about front/back alignment and margins from the beginning, not as an afterthought.
This is one of the clearest ways to prepare Canva files for printing professionally. Good files start with the right foundation. Bad files often start with a shortcut that seemed harmless in the beginning.
Bleed, Trim, Safe Zones, and Why These Small Margins Cause Big Problems
If there is one concept that separates amateur print files from professional ones, it is this: bleed, trim, and safe zone are not optional technical trivia. They are essential to how printed pieces survive the finishing process.
Let’s define them clearly.
The trim line is the final edge of the piece after cutting.
Bleed is artwork that extends beyond that trim line, usually by 0.125″ on all sides, so that color or imagery still reaches the edge if trimming shifts slightly.
The safe zone is the interior margin where your important content should stay so names, logos, and text do not end up too close to the cut.
Now let’s talk about why these exist.
Printed sheets are rarely cut with magical, zero-variance perfection. Jobs are often printed in multiples, stacked, and trimmed. Even very accurate cutting equipment has tolerance. A stack can shift slightly. Paper can compress. The blade can deflect a bit. The operator may be trimming a thick pile, and slight variation from sheet to sheet is part of the real world.
That means the final trim is never something you should design against as though it were a laser line that cannot move.
Here is what happens when there is no bleed.
Imagine a dark navy flood background on a business card. In Canva, the background stops exactly at the page edge. On screen, it looks correct. In production, the cutter trims a hair outward on one side. Now that edge shows a fine white sliver of paper. Suddenly the card looks cheap, even though the design itself was attractive.
We see this constantly.
Another classic problem is the border.
A customer makes a postcard with a neat thin border around all four edges. It looks crisp and elegant on screen. But trimming shifts even slightly, which is totally normal. Now the top border is thin, the bottom border is thick, and one side feels crooked. The whole piece looks off, even if the machine stayed well within standard tolerance.
This is why printers are often wary of borders near edges. They exaggerate the smallest movement.
Safe zones matter just as much.
Picture a promotional flyer with a phone number, website, or QR code tucked near the lower edge because the layout “looked better” that way in Canva. The final trim shifts slightly. Maybe nothing gets physically chopped off, but the text is now visually unbalanced and feels too close to the bottom. That subtle shift makes the piece feel less polished.
Or imagine a brochure where panel content sits too close to the fold line. Once folded, the text feels trapped in the crease or visually crowded. The design may technically survive, but it no longer looks professional.
This is also where laminated work can magnify issues. On laminated postcards or cards, trim inconsistency can feel more noticeable because the piece has a firmer, more defined edge. Small misalignments that might pass unnoticed on an uncoated sheet can become obvious once the piece is slick, reflective, and sharply cut.
The best practice is simple:
Extend backgrounds, photos, and color fields fully into the bleed area. Keep logos, contact information, fine text, and anything critical safely inside the live area. Avoid borders near edges unless you fully understand the risk and are designing with that risk in mind.
In Canva, that means intentionally dragging edge artwork beyond the page boundary when bleed is enabled, and mentally respecting a safe interior margin even if the design feels slightly tighter than you first wanted.
This is one of the most common file failures in professional printing, and it is one of the easiest to prevent once you understand why it exists.
Resolution, PPI vs DPI, Pixel Dimensions, and Why Canva Prints Look Blurry
Resolution is one of the most misunderstood subjects in print, and Canva users run into it constantly.
Let’s start with the terms.
PPI means pixels per inch. It describes the density of pixel data in a digital image.
DPI means dots per inch. It describes how a printer reproduces output using dots of ink or toner.
People use the terms interchangeably all the time, and in casual conversation that is usually fine. But what matters for your file is whether the image contains enough actual data for the size it will print.
For most standard print products like business cards, flyers, brochures, and postcards, 300 PPI at final size is a strong target.
Now let’s make that real.
If you have an image that is 1000 pixels wide and you print it at roughly 3.33 inches wide, that is about 300 PPI. That can look quite good.
If you take that same 1000-pixel image and print it 10 inches wide, now you are only at 100 PPI. That is where softness, jaggedness, and visible degradation become much more likely.
This is exactly why Canva designs often disappoint people in print. The image may have looked great at small scale on a screen, but the second it is enlarged for physical output, the lack of data becomes obvious.
We see this with logos all the time.
Someone grabs a logo from a website header, a Facebook page, or a screenshot. Maybe it is a PNG only a few hundred pixels wide. They place it into Canva, enlarge it to fit the design, and it looks acceptable on screen because screens are forgiving.
Then it gets printed.
Now the edges are soft. Curves are jagged. Fine details fill in. Small text inside the logo becomes unreadable. The mark loses authority immediately.
A true vector logo behaves differently. Vector art is based on paths, not a fixed pixel grid, so it can scale much more cleanly. Raster graphics, by contrast, are pixel-based. Once you enlarge them beyond what their native size supports, quality drops because you are not creating new detail. You are stretching old detail thinner.
This is why vector logos versus raster logos deserve special attention. If you have access to a real logo file from a designer, that is almost always preferable to a screenshot or web-exported PNG.
Another common problem is social media reuse.
People often use profile images, post graphics, or online ads as the starting point for print. Those assets were built for screens, fast load times, and limited dimensions. They are often nowhere near adequate for press output. What looks sharp in a feed can look awful on a printed handout.
This is why we constantly tell customers not to trust the screen alone. If you are curious if your artwork or image is a high enough resolution for the size print you want to produce, be sure to check our DPI & Resolution checker tool.
The screen is a preview. The print is the truth.
So when you prepare Canva files for printing, think in actual output dimensions and actual pixel dimensions. Ask yourself not whether the image looks okay inside Canva, but whether it contains enough real data to reproduce sharply at the size you need.
If it does not, Canva cannot rescue it. It can only place it.
Vector Graphics, Thin Rules, Hairlines, and the Details That Fall Apart in Print
One area many Canva users never think about is how small details behave once they hit a press or a large-format device.
On screen, thin lines often look precise. Tiny decorative elements can seem elegant. Fine rules separating columns or framing content can feel clean and modern.
But print is not a screen.
Very thin rules and hairlines can become fragile in production. Depending on the device, stock, color build, and output method, they may print weakly, break up, or disappear altogether. What looked refined on the monitor can feel underweight in the final piece.
This is especially true when light-colored thin lines are placed over darker backgrounds, or when very fine linework is reproduced on textured or uncoated paper. A coated sheet may hold detail better. An uncoated sheet may absorb more and soften the edge. A toner device may reproduce some elements differently than an inkjet large-format printer. Material matters.
This is also where vector versus raster becomes important again.
A line that is truly vector-based tends to maintain cleaner geometry than one that has been flattened into a low-resolution raster image. The same is true of sharp icons, logos, and type-like graphic elements.
If your design relies on finesse, small detail, and crisp geometry, file quality matters even more. That is often the difference between a design that feels premium and one that feels unexpectedly cheap after printing.
Large Format Printing, Viewing Distance, and Why 300 DPI Is Not Always Required
A lot of people repeat the phrase “always use 300 DPI” as if it applies equally to everything.
It does not.
For large-format printing, viewing distance changes the rules.
A business card is held close to the eyes, often around 12 to 18 inches away. A vinyl banner, retractable banner, or poster may be viewed from several feet away, or much farther.
At those distances, the eye cannot resolve the same level of fine detail.
That is why a banner printed at 100 to 150 PPI at final size can often look perfectly sharp in real use, while trying to build the same piece at 300 PPI full size can create a bloated, unstable, needlessly heavy file.
Here is what happens when someone tries to build a 4′ x 8′ banner at full size with excessive resolution inside Canva:
The file becomes massive. Canva may bog down. Exporting becomes less reliable. Uploads become cumbersome. Edits become more frustrating. The workflow suffers without any meaningful quality gain at normal viewing distance.
Professionals often solve this by designing at scale.
For example, a banner may be designed at 50% size at high resolution, or 25% size, and then scaled appropriately during production. That keeps the file manageable while preserving effective output quality.
Now compare that with the opposite mistake.
Someone uses a tiny web photo for a large banner. It looked okay in Canva because the preview was small. But the moment it becomes a physical banner, the softness is obvious. Faces go mushy. Edges blur. Text inside images becomes unreadable.
We see both failures constantly: files built far too large and heavy, and files built from images far too weak for the intended size.
Material also changes expectations.
A glossy coated flyer can appear crisper than a vinyl banner because the substrate, ink behavior, and viewing distance are different. A fabric banner may render differently than smooth vinyl. An indoor display viewed up close needs stronger source images than a roadside banner seen at distance.
So when using Canva for professional printing in large format, do not obsess over 300 PPI as a blanket rule. Think instead about final size, viewing distance, material, and whether your source assets are strong enough for the intended use.
That is the more production-aware way to approach large-format design.
Our DPI Calculator Can Help You Determine How Your Canva Design Will Print
Tip: If you’re using Canva, export as PDF Print or the highest quality option. Avoid screenshots, as they usually print terribly.

- For a crisp print: aim for 300 DPI at final size.
- Large posters and banners can be fine at 150–200 DPI.
- Logos from websites and social media are often too small for print.
RGB vs CMYK, Rich Black, Total Ink Coverage, and Why Printed Color Looks Different
Color disappointment is one of the most common frustrations people have with Canva prints.
A design looked vivid and exciting on screen. The print comes back and feels flatter, duller, or just different.
This is not usually because the printer messed up.
It is because RGB and CMYK are different color worlds.
Canva is fundamentally screen-oriented. Screens use RGB light. Printing uses CMYK ink. Light can create colors that ink simply cannot reproduce with the same intensity. Some bright greens, electric blues, deep violets, and neon-like shades look fantastic on screen because they are glowing. Ink cannot glow. It reflects ambient light.
So when your Canva design is converted from RGB to CMYK for production, some colors move. Some mute. Some lose vibrancy. That is normal.
We hear the same complaint constantly:
“Why does my print look dull?”
Often the answer is that the original color never truly existed in printable CMYK terms. In fact, we created a special RGB to CMYK conversion simulator that let’s you see first-hand the difference between how you think your image will look vs. what it most likely will look like printed.
Black is another major issue.
In Canva, many users simply choose black and move on. But not all blacks behave the same in print. A simple 100% K black can look acceptable for body text, yet feel weak or grayish when used as a large background or solid field. Professional print workflows sometimes use rich black builds for denser, deeper-looking large black areas.
But that comes with limits.
Too much combined ink can cause drying problems, muddiness, and smearing. That is where total ink coverage, or TAC, matters. Different stocks handle ink differently. Coated stocks can support color differently than uncoated ones. Uncoated sheets often appear softer and less saturated because more ink is absorbed into the paper surface.
That means the same file can look different on coated versus uncoated paper even when printed correctly.
This is a huge part of the commercial printer perspective that online Canva guides usually miss. Color is not just about the file. It is also about the stock, the device, the ink or toner system, and the expectations attached to that substrate.
A toner-based digital press can render color differently than an inkjet large-format printer. A matte uncoated postcard will not pop the same way a glossy coated piece will. A vinyl sign behaves differently than a sheetfed printed handout.
Canva does not give you deep control over these production variables. That is one reason Canva for professional printing has limitations. It can absolutely be used to create workable files, but it is not a fully color-managed prepress environment.
The practical takeaway is this:
Expect some color shift from screen to print. Avoid building an entire design around extremely vibrant RGB-only colors. Be cautious with large black fills. Understand that stock choice matters. And if color accuracy is mission-critical, communicate with your printer before the job goes to production.
That is a much better mindset than assuming the printed result should look exactly like a backlit monitor.
Simulate RGB vs. CMYK Conversion
RGB to CMYK Print Preview (Approximate)
This simulator helps set realistic expectations for how colors can look more muted in CMYK print than on a bright screen (especially neon / “hot” RGB colors). Images are processed in your browser and are not uploaded or saved on our server.
1) Choose an image
No file uploaded yet.
2) Choose a preset
Approximate preview. Results vary with paper, press, lighting, and screen settings.
Preview
- Neon RGB colors mute the most in CMYK print.
- Uncoated paper usually looks more muted than coated paper.
- For critical color, request a printed proof.
Paper Stocks, Substrates, Folds, Scoring, and Why the Material Changes the Result
A file can be technically correct and still produce a result that surprises the customer if the substrate was not considered.
Paper and material are not passive surfaces. They affect the final appearance in a major way.
Coated stocks typically hold detail and color more crisply because the surface is smoother and less absorbent. Uncoated stocks feel softer and often look more subdued because ink or toner interacts with the sheet differently. A thick premium card stock may feel impressive in the hand but also reveal edge alignment and trim consistency more clearly. A textured stock may add character but slightly reduce the crispness of tiny details.
Then you have synthetic materials, adhesive products, banners, foam boards, and specialty signage. Those each behave differently again.
This matters because Canva users often evaluate everything through the lens of the screen only. But a design intended for a glossy promotional postcard is not necessarily judged the same way as a design intended for an uncoated handout, a folded brochure, or a large-format display.
Folding introduces another layer.
Brochures are not just flat sheets with creases. Folding mechanics influence panel widths, content spacing, and how information is revealed when the piece is handled. Scoring may be needed on heavier stocks so folds are crisp rather than cracked. If content is placed too close to fold lines, it can feel cramped or misaligned after finishing.
We see this regularly on tri-fold brochures and other folded pieces. A design that looked symmetrical in Canva becomes visually awkward once folded because the designer was thinking in panels on a screen, not in paper moving physically through finishing.
That is why material-aware design is part of real print preparation. Not every product behaves like a flat digital image. Once the job enters the physical world, the substrate becomes part of the design outcome.
Exporting from Canva: Why the Final Click Can Make or Break the Entire Job
You can do a lot of things right in the design stage and still destroy the file during export.
This happens all the time.
People hear “export as PDF Print” and stop there, but the export step deserves much more explanation because it directly affects how the file behaves when a printer processes it through a RIP.
A RIP, or raster image processor, interprets your file for output on the production device. The better structured the file is, the more predictably that process tends to go.
PDF Print is usually the best Canva export option for professional printing because it preserves layout better, keeps text sharper, and supports bleed and crop marks. It is simply closer to what a printer wants than a flattened web-style image export.
Now compare that to JPG.
A JPG export compresses the file. It flattens the design into a raster image. Compression can throw away detail. Text and vector-like elements lose the advantages they had in a more print-friendly format. Fine edges may soften. The file becomes less robust for production.
PNG is often better than JPG in some ways because it avoids some compression issues, but it is still fundamentally a raster export. That means the whole file is one big pixel-based image. It may be acceptable in certain situations, but it is generally less ideal than a proper print PDF for commercial workflows.
Then there is bleed.
If bleed is not included at export, the printer either has to stop and fix the problem, make assumptions, or risk a compromised final result. Crop marks help define the intended trim. Without them, especially on certain jobs, there can be more ambiguity and more room for error.
Font behavior matters too.
If a PDF does not preserve text reliably or if fonts substitute, layout can shift. A line break changes. A headline reflows. Now spacing is different. What was carefully arranged in Canva no longer matches the intended design.
Transparency can also create trouble. Canva effects like shadows, overlays, transparency, and layered blending can behave unpredictably when flattened or interpreted through output workflows. Sometimes they survive fine. Sometimes subtle visual shifts appear. We have seen shadows disappear, layered areas print differently than expected, or transparency interactions create changes once the file is processed for output.
This is why the export step is not just administrative. It is part of print preparation itself.
Before sending the file to press, open the exported PDF and inspect it carefully. Check the dimensions. Check whether bleed is actually present. Zoom in and inspect image sharpness. Make sure nothing important sits too close to trim or fold lines. Make sure the file feels complete, not just “finished enough.”
That last review catches a surprising number of preventable problems.
Why Print Shops Reject Canva Files and Why That Is Usually the Right Call
When a commercial printer pushes back on a Canva file, many customers interpret that as unnecessary fussiness.
Usually it is the opposite.
Printers reject files because they know what those files will do once they hit production.
If there is no bleed, they know white edges are likely.
If images are weak, they know softness is coming.
If text hugs the trim, they know the piece will feel off even if nothing gets chopped.
If a brochure panel is built incorrectly, they know the fold will expose it.
If the file is exported the wrong way, they know extra prepress work or unpredictable output may follow.
That is experience speaking.
Print shops see failure patterns over and over. They recognize them fast because they have watched those problems become real physical defects on actual jobs.
Common rejection reasons include missing bleed, wrong trim size, low-resolution images, RGB color expectations, content too close to edges, poor export format, and files that clearly were not built with the product’s finishing requirements in mind.
Fixing those issues takes time. Sometimes it means minor corrections. Sometimes it means completely rebuilding part of the file. Either way, it slows production and may add cost.
The best files do not need rescue.
They move cleanly from design to prepress to production because the person who built them understood what the printer would need before the file was ever uploaded.
That is the real goal.
FAQ: Canva and Professional Printing
Why do my Canva prints look dull compared to my screen?
Because your screen uses RGB light and printing uses CMYK ink. Screens are backlit, which makes colors appear brighter and more vibrant. Print reflects ambient light instead of emitting it, so some colors naturally look less intense. This is especially true for very bright blues, greens, and neon-like shades. The problem usually is not that the printer failed. It is that the original Canva design relied on screen color behavior that does not translate directly into ink on paper or vinyl.
What is bleed in Canva, and why is it so important?
Bleed is extra artwork that extends beyond the final trim size, usually by 0.125″ on each side. It exists because printed pieces are cut physically, and physical cutting always has slight tolerance. Without bleed, backgrounds and photos that were supposed to reach the edge can end up showing thin white slivers after trimming. If you want color or imagery to run cleanly to the edge of the finished piece, bleed is essential.
Can Canva files be used for professional printing?
Yes, they can, but only if they are set up properly. Canva can produce usable print files for many jobs, especially if document size, bleed, safe zones, image quality, and export settings are handled correctly. The problem is not that Canva is automatically unusable. The problem is that many users assume a nice-looking Canva design is automatically print-ready when it often is not.
Why does my printed color look different from what I designed?
Color shifts happen because print production does not use the same color system as your monitor. Canva is generally screen-first, while commercial printing relies on ink behavior, device profiles, material choice, and production limitations. Coated and uncoated sheets can also make the same file look different. So can toner-based presses versus large-format inkjet output. The printed result is influenced by both the file and the substrate.
What resolution should I use in Canva for print?
For most standard print products, 300 PPI at final size is a solid benchmark. That means the image should contain enough pixels to support the size it will actually print. Large format is different because viewing distance matters. A banner does not usually need 300 PPI at full size to look sharp from several feet away. The key is not chasing a magic number blindly, but understanding final size, intended viewing distance, and source image quality.
Why do my Canva images look blurry when printed?
Usually because the original image was too low resolution for the size it was printed. Common culprits include screenshots, website images, social media graphics, and small PNG logos pulled from the internet. Screens are forgiving and can make weak images appear acceptable. Print exposes the actual file quality. If there is not enough detail in the source image, the print will show it.
Should I export from Canva as JPG, PNG, or PDF?
For most professional print work, PDF Print is the best choice. It tends to preserve text and layout more reliably and supports bleed and crop marks. JPG introduces compression and flattens everything into a raster image. PNG is often cleaner than JPG, but it is still rasterized and generally less ideal than a print-ready PDF for commercial workflows. If the piece is going to a professional printer, PDF Print is usually the correct answer.
What is a safe zone in print design?
The safe zone is the interior area where important content should stay so it does not end up too close to the trim. Names, phone numbers, logos, QR codes, and other critical elements should never sit right at the edge just because it looked balanced on screen. Even if trimming is accurate, content that is too close to the edge often feels awkward and visually unprofessional in the final piece.
Why do borders print unevenly even when my design is centered?
Because trimming has tolerance. A border close to the edge exaggerates even the slightest shift in cutting. One side becomes thicker and another thinner, and suddenly the whole piece looks crooked. This is a very common problem with postcards and business cards. Borders are not impossible, but they are much riskier near trim than most Canva users realize.
Do I need crop marks when exporting from Canva?
For many professional print jobs, yes. Crop marks help define where the piece is meant to be trimmed. They are part of making the file clearer and more production-friendly. Combined with bleed, they reduce ambiguity and help the finishing process align more cleanly with the intended design.
Can I use a screenshot or social media image in a print file?
Usually that is a bad idea unless the image is being printed very small and you have verified the quality. Screenshots and social graphics are often too low resolution for print. They may look fine inside Canva because the preview is flattering, but once printed at real size they often appear soft, pixelated, or unprofessional. Original high-resolution assets are always better.
Why do brochures sometimes fold wrong even when the design looked correct?
Because brochure design involves more than visual panel balance. Fold mechanics matter. Some panels need slight width adjustments, and content placement near folds matters a lot. If all panels are treated as perfectly equal when the finishing method requires otherwise, the folded result can feel cramped, misaligned, or awkward even though the flat Canva design looked fine on screen.
Final Thoughts
Canva is a powerful and useful design tool. It has made layout creation dramatically more accessible, and for many projects that is a great thing.
But Canva does not remove the realities of print production.
Files still move through presses, printers, cutters, folders, laminators, and finishing equipment. Paper still shifts. Ink still behaves differently on different stocks. Banners are still viewed from distance. Folds still need room. Low-resolution images still print badly. RGB colors still do not magically become perfect CMYK matches. And export settings still matter.
That is why understanding production is so important.
If you treat Canva as though it automatically creates press-ready work just because the design looks good on your screen, you will keep running into the same frustrating problems.
If you treat Canva like a design tool that still needs to be prepared properly for professional printing, your results will improve dramatically.
That is the difference between a file that merely looks finished and a file that is actually ready for print.
And in commercial printing, that difference is everything.