


Graphic Design Tips, Printing Tips
What Is Bleed in Printing? And Why It Matters More Than You Think
If you have ever ordered something printed and noticed thin white lines along the edges, you have already experienced a bleed issue, even if you did not know what it was called at the time.
Bleed is one of those printing terms that sounds technical, but the idea behind it is actually very simple. Once you understand it, you will immediately see why printers care about it so much and why it plays such a big role in how professional your finished piece looks.
This guide explains what bleed is, why it is required, and when it actually matters, without getting overly technical.
What Does Bleed Mean in Printing?
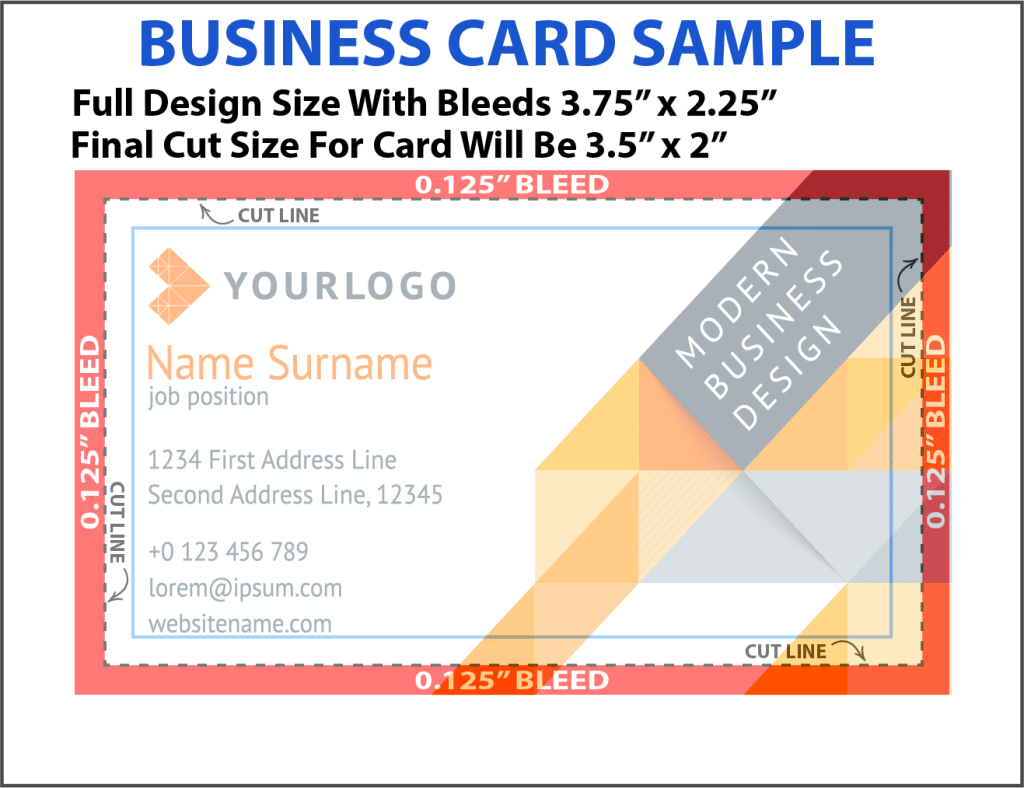
In printing, bleed means that your design extends slightly past the final size of the printed piece.
Instead of stopping artwork exactly at the edge of the page, the background colors, images, or graphics are designed to run beyond the edge. That extra area gets trimmed off after printing.
The goal is simple. When the piece is cut down to its final size, the color or image goes all the way to the edge with no white paper showing.
Bleed is not something you see in the finished product. It exists only to make sure the finished product looks clean.
Why Bleed Is Required in Professional Printing
Printing and trimming are physical processes. Paper moves. Stacks shift. Cutters are precise, but nothing is perfectly aligned every single time.
If artwork stops exactly at the trim edge, even a tiny movement during cutting can expose the white paper underneath. That is how those thin white borders appear.
By adding bleed, printers give themselves room to work. If the paper shifts slightly while being cut, there is still color or image past the trim line, so nothing looks unfinished.
Bleed is not about mistakes. It is about planning for reality.
What Happens If You Do Not Include Bleed?
When a file is submitted without bleed, a few things can happen.
Sometimes white edges appear on one or more sides of the finished piece. Other times the printer has to slightly shrink the artwork to avoid cutting into important content. In some cases, the job is paused while the file is corrected.
None of these outcomes are ideal, especially if you are on a deadline.
Including bleed from the start avoids all of this and keeps the project moving smoothly.
Bleed vs Trim vs Margins Explained Simply
These three terms often get mixed together, but they each serve a different purpose.
Trim is the final size of the printed piece after it is cut.
Bleed is the extra artwork that extends past the trim line and gets cut off.
Margins, sometimes called safe areas, are the space inside the trim where important text and logos should stay.
A well prepared print file includes all three. Artwork extends into the bleed area, important content stays safely inside the margins, and the trim line defines the final size.
Once you understand this relationship, print setup becomes much easier.
When Bleed Actually Matters
Not every document needs bleed. Plain text documents with white backgrounds usually do not.
Bleed matters most when your design includes color, images, or graphics that touch the edge of the page.
This includes things like:
-
brochures and flyers
-
posters and large format prints that are printed edge-to-edge
If the final piece is folded, stapled, or bound, bleed is almost always required.
How Much Bleed Is Normally Required?
Most commercial printers use the same standard bleed size.
That standard is one eighth of an inch on all sides.
This means the artwork extends one eighth of an inch past the final trim size on every edge. While some specialty jobs may require more, this measurement works for the vast majority of printed materials.
If you are ever unsure, asking your printer before exporting your file can save time later.
Setting Up Bleed in Canva
Canva is popular because it makes design accessible, but bleed settings are easy to miss.
When exporting a file from Canva for professional printing:
-
choose PDF Print
-
turn on crop marks and bleed
-
make sure background colors and images extend fully to the edge
Canva handles the technical part once the option is enabled, but the design itself still needs to reach the edge of the page. If it does not, bleed will not help.
This is one of the most common issues printers see with Canva files.
Professional Printing vs Home Printing
Home printers and professional printers work very differently.
Most home printers cannot print edge to edge. They automatically leave white margins and are not designed for trimming after printing. Because of that, bleed is usually not part of home printing.
Professional printers use larger sheets of paper and trim them down to size after printing. That trimming step is exactly why bleed is necessary.
If a project is being professionally printed and trimmed, bleed should almost always be included.
Why Bleed Makes Printing Look More Professional
Bleed is one of those details that most people do not notice until it is missing.
When bleed is set up correctly:
-
colors reach the edge cleanly
-
photos look intentional and polished
-
the piece feels professionally produced
When bleed is missing, even a well designed piece can look unfinished.
It is a small setup step that has a big impact on the final result.
Final Thoughts
Bleed is not complicated, but it is important.
It exists to account for real world printing and trimming, not because printers want to make things difficult. Including bleed prevents white edges, reduces delays, and helps ensure the finished piece looks exactly the way it should.
If you are printing anything with background color, photos, or full page graphics, bleed should be part of your file setup every time.
And if you are ever unsure, a professional printer can review your file before printing and let you know if anything needs to be adjusted.
That small step can save time, money, and frustration.