
Graphic Design Tips
How To Save Money On Graphic Design
Save Money On Your Printing By Providing Us Print Ready Files
The quality of your artwork can have a big impact on not only the quality of the printed product but also the costs associated with your print job. We highly encourage our customers to send us “print ready” artwork so that set up costs can be reduced and the overall quality of the print is as perfect as it can possibly be.
Use A Resolution Of 300 dpi
If you want your printed design to look good, then you will need to make sure you are sending us a high quality, high resolution graphic. We will need to have design files provided to us at a minimum of 300dpi. If you are sending images to us that you’ve downloaded, those will almost always be 72dpi. What looks good on your computer monitor, doesn’t necessarily mean it will look good when printed. Low quality, low resolution images will ALWAYS produce horrible results.
Use The Correct File Type
Most printing companies prefer to have files created in Illustrator or InDesign. This gives a vectorized and layered image that is infinitely scalable without losing quality. Most common file types that are submitted for printing are .AI, .SVG, .EPS, .PDF Please do not send raster type graphics such as JPG or PNG files for printing.
The difference between a vector and raster image may seem complicated, but in reality it’s quite simple. A raster image is made up of a grid of colored pixels. The more you zoom in, the more you can see the individual pixels. If you have a small raster image and you try to scale it up to be printed on a banner, that means you are also scaling up each individual pixel. It’s not uncommon to scale a raster image up and be able to see each individual block (pixel) that makes up the image.
A vector file however, is built off mathematically defined shapes, lines and curves. The math doesn’t change no matter how big the image is, so the scalability is infinite. You could take a vectorized image and scale it up to the size of the moon and still not see the individual pixels, because that’s not how the image is produced.

Use CMYK Not RGB Color Space
Using the correct color space is a vital first step in creating your design. Most graphic design software will give you the option of working in RGB or CMYK. RGB is almost limitless in color scope, and it is the basis of colors produced on computer screens. CMYK is based on four colors (cyan, magenta, yellow and black) to make up all possible colors and is therefore more limited. It is important to implement these limits in the artwork, to give you a more realistic expectation of what your printed design will look like. In RGB colors tend to look more vibrant and bright, and you may be able to create colors in RGB that are virtually impossible to recreate in CMYK.
Convert Text To Outlines
If your design uses a specific font that we don’t have installed, it may be difficult for us to locate. If you are using a program like Illustrator, it’s best to convert all text to outlines.
Use Bleeds In Your Design
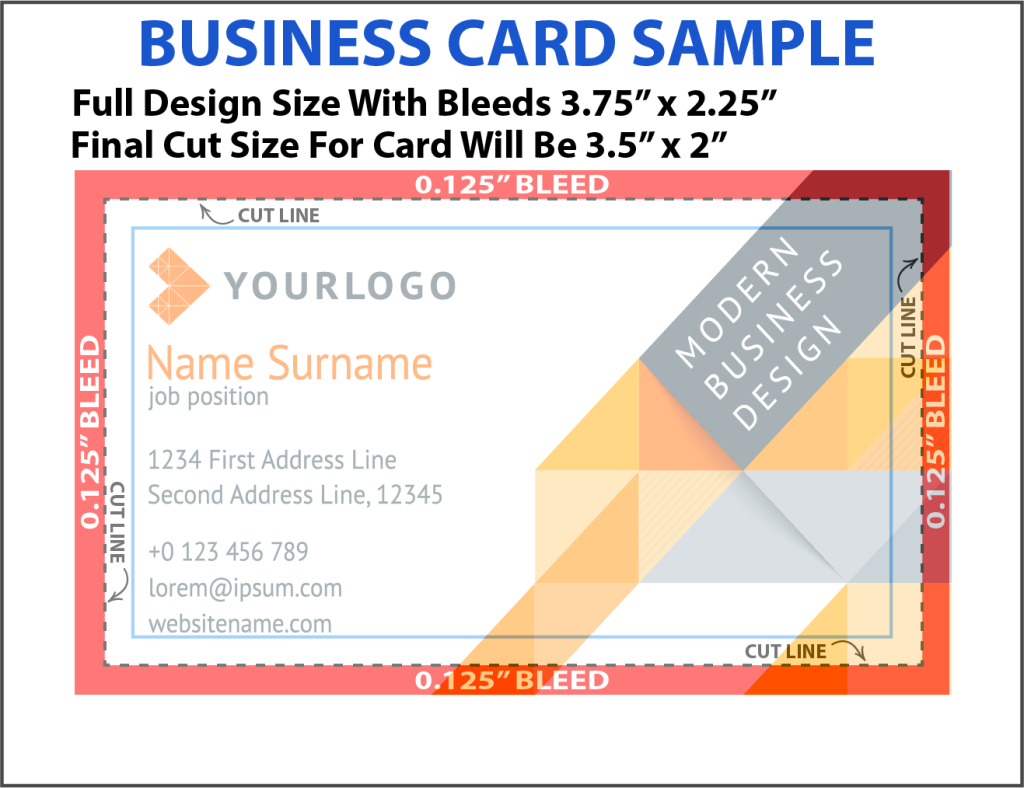
When designing your artwork for print, make sure to include bleeds. This is vitally important if you want your artwork to extend to the very edge of the printed media. Printers can’t print to the very edge of the paper in most cases, so we print on a larger sheet of paper and cut that down to size. So if you have a design that you want the artwork to extend to the edge such as business cards, flyers, brochures, etc. then you will need to make sure you incorporate bleeds into your design. In this example we will use a business card design to illustrate proper use of bleeds. Business cards are typically cut to 3.5-inches by 2 inches. If you have artwork going to the edge, then you will need to use bleeds as illustrated below…
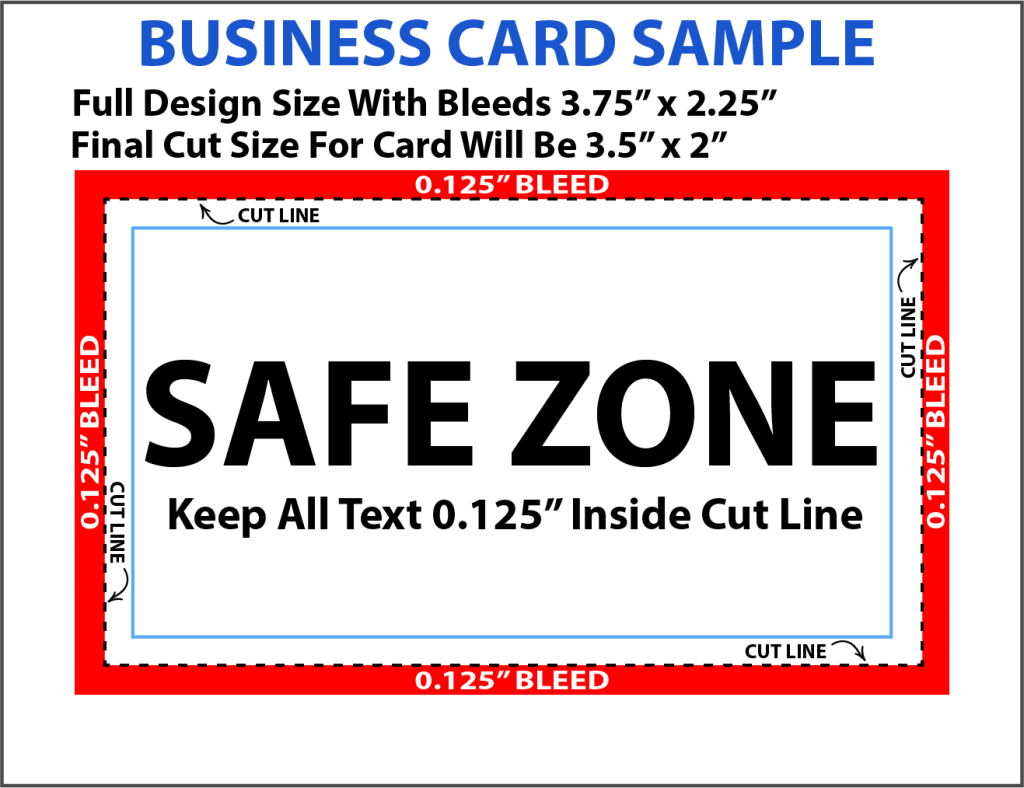
You have a couple of areas here that are important. The BLEED extends 0.125″ (an 1/8th inch) beyond the cut line on all sides. If you want graphics, colors, etc. to go to the very edge of the card, then you will want to make sure they extend into the bleed. The SAFE ZONE is where all of the text and important images should be kept, which will be about 0.125″ inside the cut line on all sides. You can see an example below where we’ve overlaid a design, and then an image of the final cut.